SUPPLIES & TOOLS:
- LION BRAND® HEARTLAND®
- Acadia 2 balls (A)
- Sequoia 1 ball B)
- or colors of your choice
- LION BRAND® crochet hook size J-10 (6 mm)
- LION BRAND® Pom-Pom Maker
- LION BRAND® stitch markers
- LION BRAND® large-eyed blunt needle
- Sewing needle and thread
SIZE: Finished Circumference About 19", will stretch to fit a range of sizes
GAUGE: 14 1/2 sc + 7 rows = about 4".
BE SURE TO CHECK YOUR GAUGE.
DIRECTIONS:
STITCH EXPLANATIONS:BPDC: (back post double crochet) Yarn over, insert hook from back to front then to back, going around post of indicated st, draw up a loop, (yarn over and draw through 2 loops on hook) twice. Skip st in front of the BPDC.
FPDC: (front post double crochet) Yarn over, insert hook from front to back then to front, going around post of indicated st, draw up a loop, (yarn over and draw through 2 loops on hook) twice. Skip st behind the FPDC.
FPTR: (front post treble crochet) Yarn over twice, insert hook from front to back then to front, going around post of indicated st, draw up a loop, (yarn over and draw through 2 loops on hook) 3 times. Skip st behind the FPTR.
sc2tog (single crochet 2 sts together) (Insert hook in next st and draw up a loop) twice, yarn over and draw through all 3 loops on hook - 1 st decreased.
tr6tog (triple (treble) crochet 6 sts together) *(Yarn over) twice, insert hook in next st and draw up a loop, (yarn over and draw through 2 loops) twice; rep from * 5 more times, yarn over and draw through all 7 loops on hook - 5 sts decreased.
NOTES:
Hat is worked in joined rnds with RS always facing, beg at top of Hat.
Bow is worked separately and sewn to Hat.
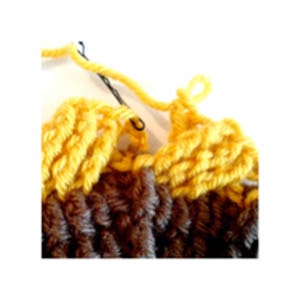
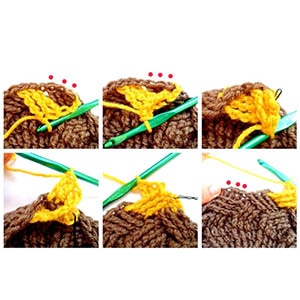
We used contrast color yarns to make our step-by-step photos clear.
HAT:
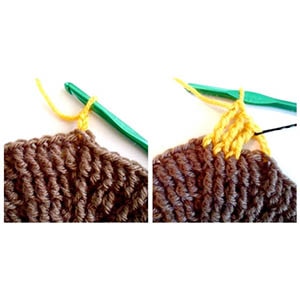
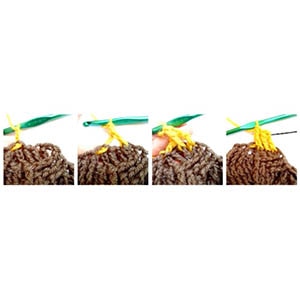
With A, ch 4; join with sl st in first ch to form a ring.
Rnd 1: Ch 3 (counts as first dc), 13 dc in ring; join with sl st in top of beg ch - you will have 14 dc at the end of this rnd.
Rnd 2: Ch 3 (counts as first dc), FPDC around same st as joining, *dc in next st, FPDC around same st; rep from * around; join with sl st in top of beg ch - 28 sts (14 dc and 14 FPDC).
Rnd 3: Ch 3 (counts as first dc), FPDC around same st as joining, FPDC around next st, *dc in next st, FPDC around same st, FPDC around next st; rep from * around; join with sl st in top of beg ch - 42 sts (14 dc and 28 FPDC).
Rnd 4: Ch 3 (counts as first dc), FPDC around same st as joining, FPDC around next 2 sts, *dc in next st, FPDC around same st, FPDC around next 2 sts; rep from * around; join with sl st in top of beg ch - 56 sts (14 dc and 42 FPDC).
Rnd 5: Ch 3 (counts as first dc), FPDC around same st as joining, FPDC around next 3 sts, *dc in next st, FPDC around same st, FPDC around next 3 sts; rep from * around; join with sl st in top of beg ch - 70 sts (14 dc and 56 FPDC).
Rnd 6: Ch 3 (counts as first dc), FPDC around same st as joining, FPDC around next 4 sts, *dc in next st, FPDC around same st, FPDC around next 4 sts; rep from * around; join with sl st in top of beg ch - 84 sts (14 dc and 70 FPDC).
Notes:
When working in skipped sts, always work them in right to left order (if you are left-handed work them in left to right order).
When working behind previously made sts, you may find it helpful to fold the previously made sts forward to more easily see and reach the sts behind them.
Rnd 7: Ch 3 (does not count as a st), sk same st as joining, sk next 2 sts, FPTR around each of next 3 sts, place a marker in the first of the 3 FPTR just made; working behind the 3 FPTR just made, FPTR around beg ch-3 of previous rnd, FPTR around each of the next 2 skipped sts, *sk next 3 sts, FPTR around each of next 3 sts;
working behind the 3 FPTR just made, FPTR around each of the 3 skipped sts; rep from * around; join with sl st in top of marked st, remove marker - 84 sts.
Rnd 8: Ch 3 (does not count as a st); working in front of the beg ch-3 you just made, FPTR around each of the last 3 sts of the previous rnd (the last 3 sts are angled like this: and are hiding behind sts angled like this: ///), place a marker in the first of the 3 FPTR just made,
sk next 6 sts (these consist of 2 sets of 3 sts each, one set of 3 sts is angled like this: /// and is on top of the other set of 3 sts that is angled like this: ), FPTR around each of the next 3 sts (that are angled like this: /// and are on top); working in front of the 3 FPTR just made, FPTR around each of the last 3 skipped sts (angled: and are hiding behind), Note: The first 3 skipped sts (angled: ///) will be worked later at the end of the rnd,

*sk next 3 sts (angled: and behind other sts), FPTR around each of the next 3 sts (angled: ///); working in front of the 3 FPTR just made, FPTR around each of the last 3 skipped sts (angled: ); rep from * around; fold the first (marked) 3-FPTR of the round forward and workingbehind the group, FPTR around each of the first 3 skipped sts; join with sl st in marked st, remove marker.
Rnd 9: Ch 3 (does not count as a st), sk first 3 FPTR (angled: ), FPTR around each of next 3 sts (angled: /// and are hiding the behind the 3 sts just skipped), place a marker in the first of the 3 FPTR just made;
working behind the 3 FPTR just made, FPTR around each of the 3 skipped sts, *sk next 3 sts (angled: ), FPTR around each of next 3 sts (angled: /// and are hiding behind the 3 sts just skipped); working behind the 3 FPTR just made, FPTR around each of the 3 skipped sts; rep from * around; join with sl st in marked st, remove marker.
Rnds 10-15: Rep Rnds 8 and 9 three more times.
Do not fasten off.
Band
Rnd 1: Ch 1, sc in same st as joining, sc in next 3 sts, sc2tog, *sc in next 4 sts, sc2tog; rep from * around; join with sl st in first sc - 70 sc.
Rnd 2: Ch 1, sc in same st as joining, sc in each st around; join with sl st in first sc.
Remainder of band is now worked back and forth in rows.
Row 3: Sl st in next 8 sts, ch 2 (does not count as a st), dc in same st, dc in next 54 sts; leave rem sts unworked - 55 dc.
Row 4: Ch 2 (does not count as a st), turn, dc in first st, 2 dc in next st, (dc in next st, BPDC around next st) 25 times, dc in next st, 2 dc in next st, dc in next st - 57 sts (32 dc and 25 BPDC).
Row 5: Ch 2 (does not count as a st), turn, dc in first st, 2 dc in next st, dc in next st, *dc in next st, FPDC around next st; rep from * to last 4 sts, dc in next 2 sts, 2 dc in next st, dc in last st - 59 sts (34 dc and 25 FPDC).
Row 6: Ch 2 (does not count as a st), turn, dc in first st, 2 dc in next st, dc in next 2 sts, *dc in next st, BPDC around next st; rep from * to last 5 sts, dc in next 3 sts, 2 dc in next st, dc in last st - 61 sts (36 dc and 25 BPDC).
Row 7: Ch 2 (does not count as a st), turn, dc in first st, 2 dc in next st, dc in next 3 sts, *dc in next st, FPDC around next st; rep from * to last 6 sts, dc in next 4 sts, 2 dc in next st, dc in last st - 63 sts (38 dc and 25 FPDC).
Row 8: Ch 24 for first tie, turn, sl st in 5th ch from hook and in next 19 ch, dc in next dc, 2 dc in next st, dc in next 4 sts, *dc in next st, BPDC around next st; rep from * to last 7 sts, dc in next 5 sts, 2 dc in next st, dc in last st.
Row 9: Ch 24 for 2nd tie, turn, sl st in 5th ch from hook and in next 19 ch, work 2 sl sts in the side of the next dc; leave remaining sts unworked.
Fasten off.
BOW
With B, ch 10.
Row 1: Beg in 5th ch from hook, tr6tog, ch 4, 6 tr in top of tr6tog just made.
Fasten off.
FINISHING:
Pom-poms
With A and B held together, following package directions, make 1 large size pom-pom and 2 smaller size pom-poms. Tie the larger pom-pom to top of Hat. Tie the smaller pom-poms to end of ties.
With sewing needle and thread, sew Bow to Hat.
Weave in ends.
ABBREVIATIONS:
beg = begin(ning)(s)
ch = chain
dc = double crochet
rem = remain(ing)
rep = repeat
rnd(s) = round(s)
RS = right side
sc = single crochet
sk = skip
sl st = slip stitch
st(s) = stitch(es)
tr = treble (triple) crochet