Flannel Bunting with Optional Swaddle Wrap
Item #
4865884P63
SUPPLIES & TOOLS:
- Land of Whimzie Woodsie Pal or other print flannel fabric*:
- 7/8 yd Bunting only?
- 1½ yds Bunting with Swaddle Wrap?
- *Additional yardage required for directional prints
- 22" Sweater & jacket coil separating zipper
- 1 pkg 3/4" sew-on hook and loop tape
- Clear tape
- Removable fabric marker
- Basic sewing supplies
- Sewing machine
- Zipper foot
- Iron & pressing surface
- Serger (optional) Finished Size: 18"x25-1/4"
DIRECTIONS:
Read all instructions before beginning project. Do not pre-wash fabrics. Before cutting, press with a dry iron on cotton setting. Use a 1/2" seam allowance and sew fabrics with right sides together (RST) unless otherwise noted. Finish seams with zigzag or serge stitching and backstitch at beginning and end of seams.Note: When printing pattern pieces, check that page size is set to actual size and compare printout with measurements noted on the patterns.
-
CUTTING:
- To print the patterns, click on the "Download Project PDF" button (above). Cut out Pattern Pieces on outside lines. Overlap edges of Pattern Pieces so lines match and tape together.
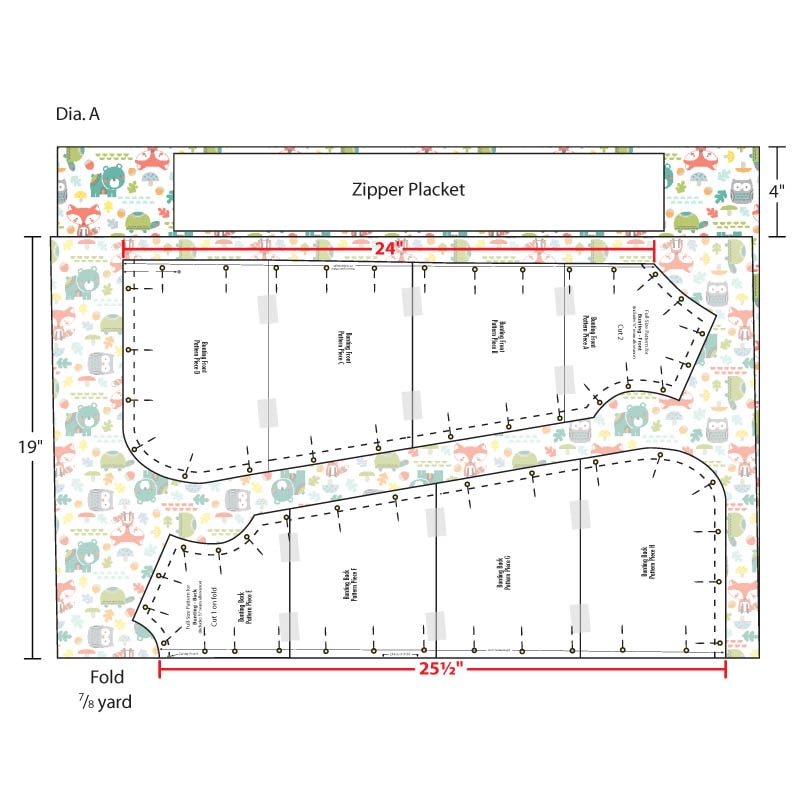
- Fold fabric as shown with a 4" single layer for Zipper Placket. Lay out Bunting patterns and pin in place. Cut out on solid lines (Dia. A). Transfer Center Front and Lower Front markings to fabric. Lightly press Center Fold in Bunting Back.
- Zipper placket: cut one - 3-1/2"x22"
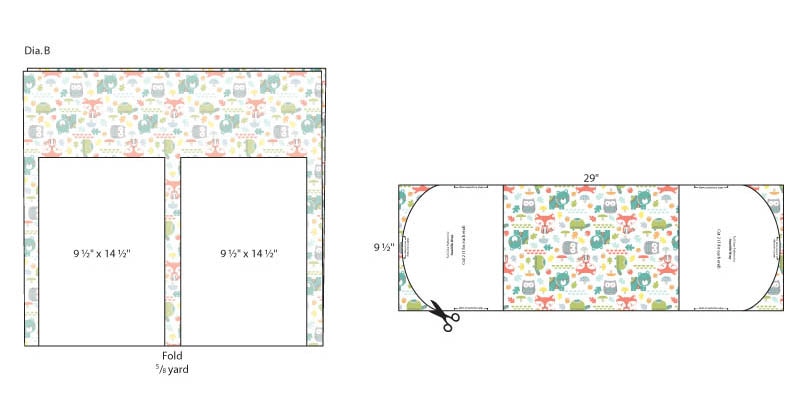
- Swaddle Wrap Option: Cut two - 9-1/2"x14-1/2" (on fold) ?Unfold pieces and layer on top of each other. Place Swaddle Wrap pattern as shown to cut curved ends (Dia. B).
- Hook and loop tape: cut two - 3/4"x6"
-
SEWING:
- Finish all edges of Bunting Front and Back except neckline and arm holes, with serging or zigzag stitching.
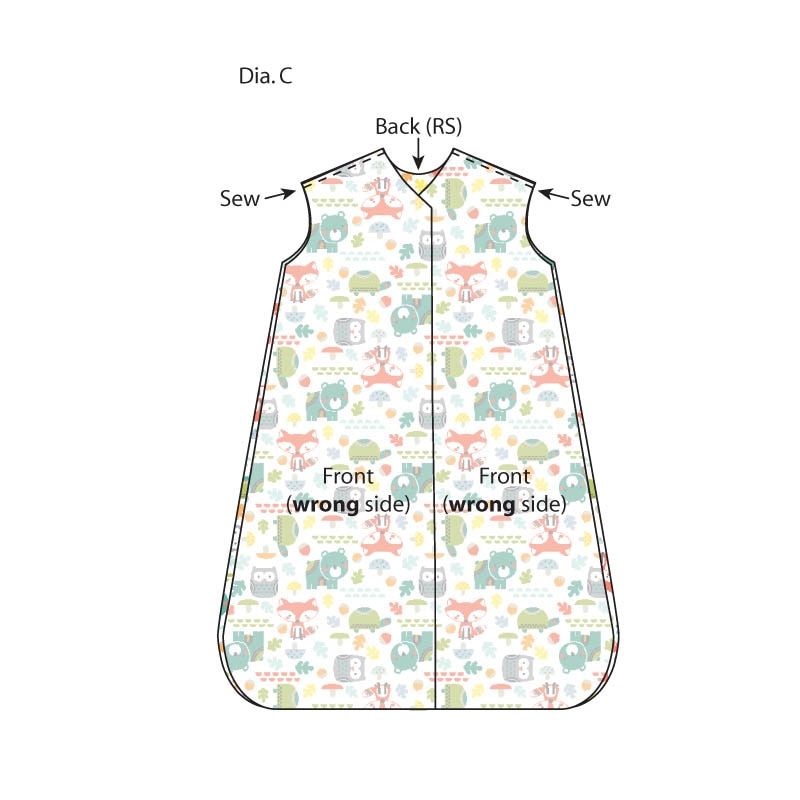
- Pin and sew shoulders RST (Dia. C); press seams open.
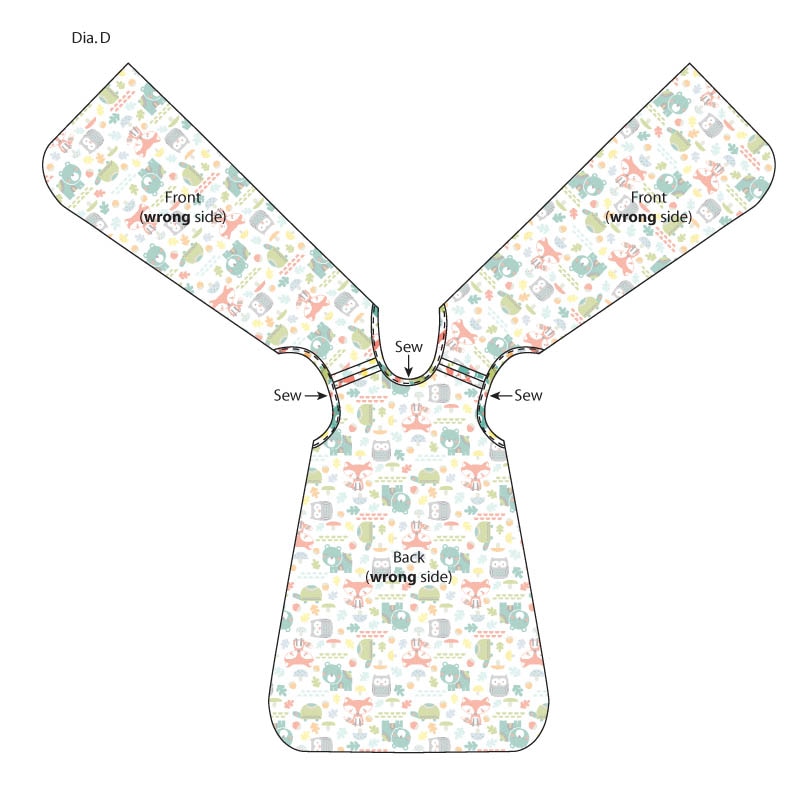
- Fold and press the edge of the armholes and neck 1/4" to the wrong side twice; sew close to folded edge to hem (Dia. D).
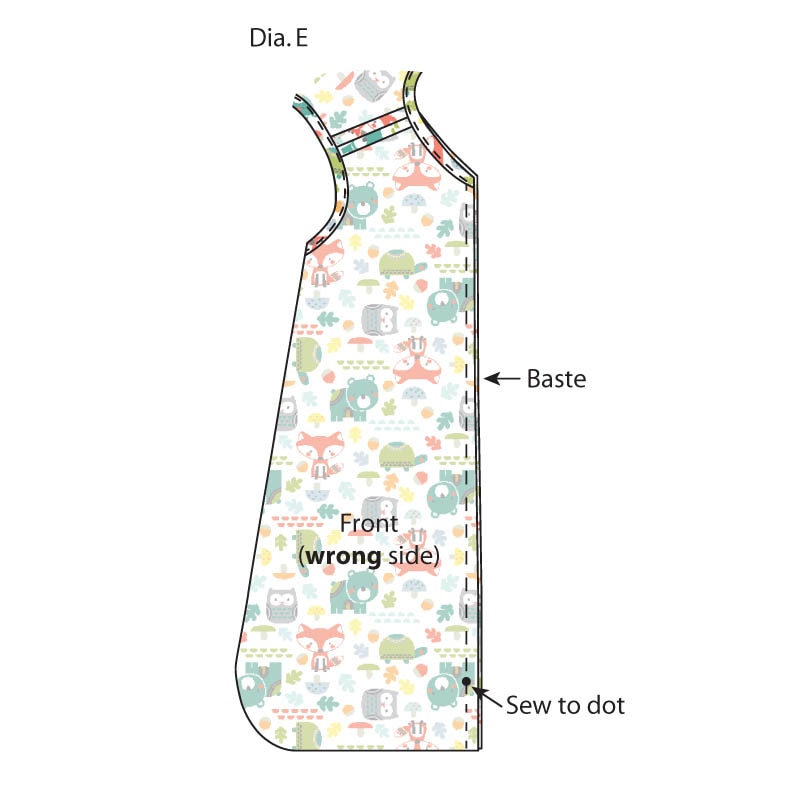
- Place Fronts RST. Sew from bottom edge to mark; backstitch. Baste, using longest stitch length, from mark to top edge. Press seam open (Dia. E).
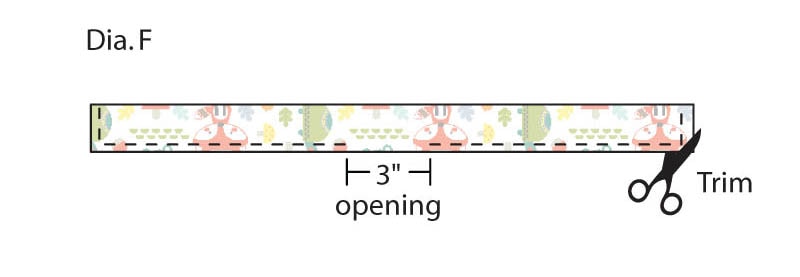
- Fold Zipper Placket (3-1/2"x22") RST so long edges meet; sew using 1/4" seam around cut edges, leaving a 3" opening for turning. Trim corners diagonally and turn right side out; press (Dia. F).
- Hand stitch opening closed.
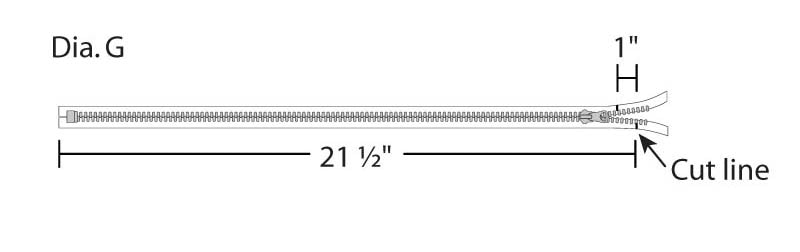
- To cut zipper to the correct length, measure up 21-1/2" from the zipper bottom and make a mark. Pull zipper tab down 3" and cut zipper off at mark. Measure down 1" from the cut edge and make another mark (Dia. G).
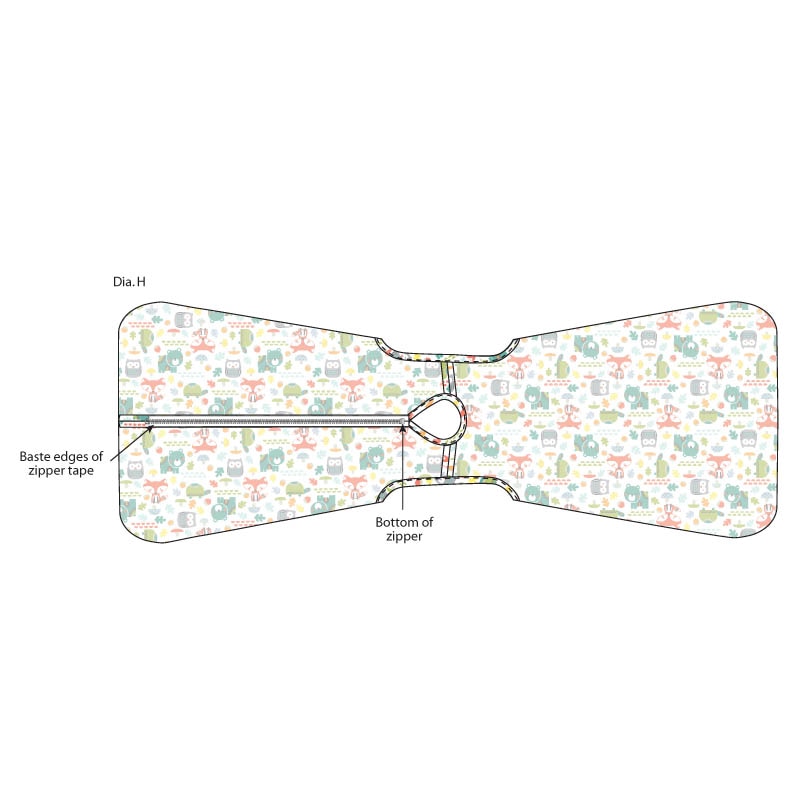
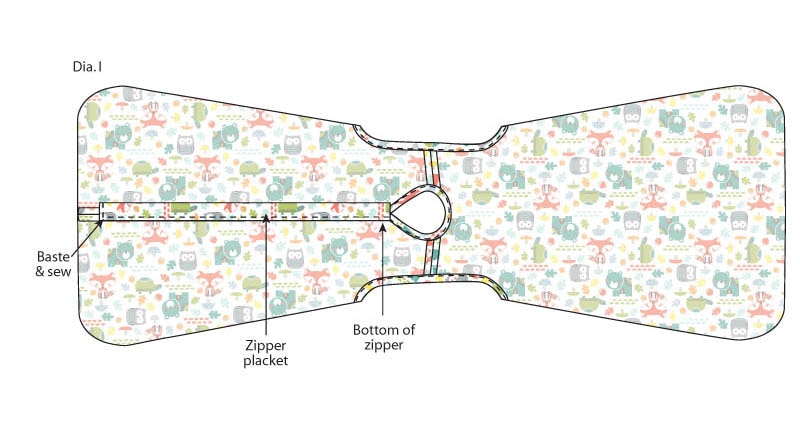
- Lay Bunting Front wrong side up on a flat surface. Place zipper with the right side down on Front center seam with zipper bottom about 1/4" from the neckline. Center the zipper teeth along the basted seam and pin. Baste in center of zipper tape and across the end using a zipper foot (Dia. H). Note: The zipper opening will be at the bottom of the Bunting, so the zipper pull is at the bottom.
- Turn Bunting over to sew zipper in place from right side. Begin at the neckline and sew 1/4" from folded edges around zipper and back to neckline, stopping to move zipper tab while sewing. Note: A few basting stitches will need to be removed.
- With Bunting Front wrong side up, place short edge of Zipper Placket even with bottom end of zipper (at neckline) and long folded edge even with right zipper tape; baste through all layers along side and across bottom (Dia. I). With the right side of Bunting Front facing up, sew over basting to attach placket.
- Pin side seams RST and sew from one underarm edge to the other. Press seams open.
Optional Swaddle Wrap:
- To print the pattern for the Swaddle Wrap, click on the "Download Project PDF" button (above). Cut and pin Swaddle Wrap pieces RST and use a 1/4" seam allowance to sew leaving a 4" opening on a straight edge for turning. Clip curves and turn right side out; press and hand stitch opening closed. Topstitch 1/4" away from outer edge. Swaddle Wrap should measure 9"x28-1/2".
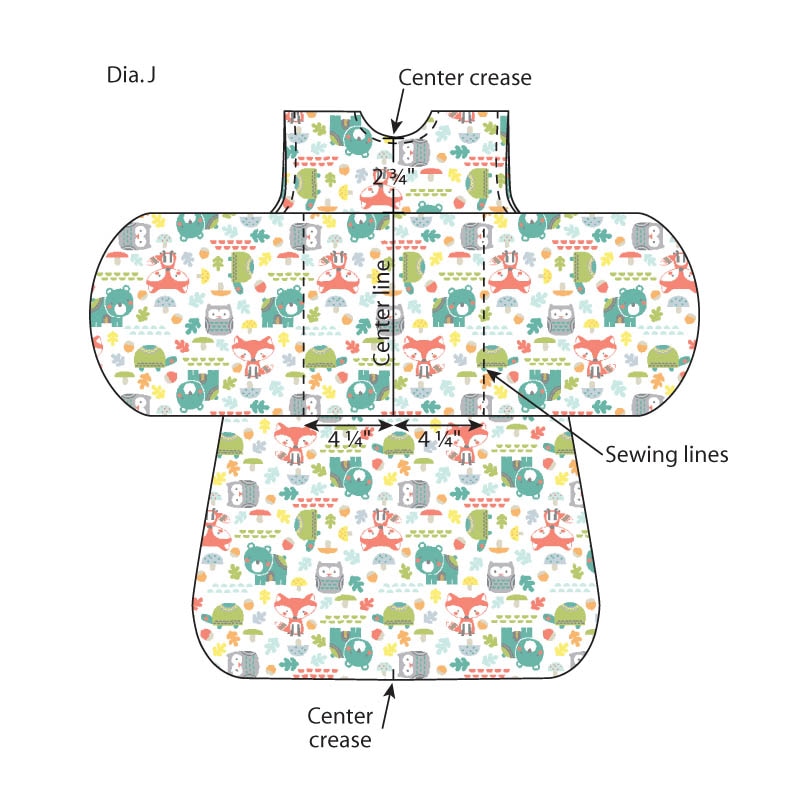
- With the bottom edge of the Swaddle Wrap toward you, fold the Swaddle Wrap so curved edges meet to find the center and draw a center line with the removable marker across the width. Along the center crease of the back, mark 2 ¾" down from neckline. Pin the Swaddle Wrap to the Bunting Back with the top of the center line matching the drawn mark. Measure 4 ¼" on both sides of the center line and use a removable marker to draw straight sewing lines. Sew along lines through Wrap and Bunting Back (only) to attach (Dia. J).
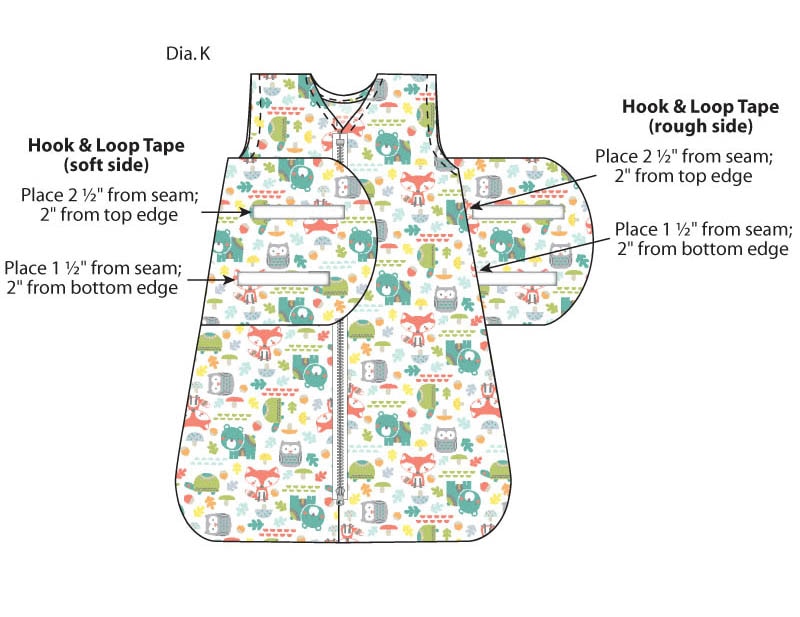
- Place Bunting with Front side up on flat surface and extend the right end of Swaddle Wrap out to the side. Measure 3" from the seam and down 2" from the top edge; mark. Pin the hook tape (rough side) to Swaddle at mark. Repeat with the loop tape (soft side) on the back side of the left Swaddle. Check that they line up and sew around edges (Dia. K). Repeat with the second hook and loop tape piece, measuring 1 ½" from the seam and 2" from the bottom edge.
Not intended for children's sleepwear.